import cv2  #python 3.8 ile sanırım burayı daha kolay çalıştırabiliyorsun. Diğer bilgisayarımda 3.9 da epey bir sıkıntı yaşadım çalıştırırken bilemedim.
import numpy as np

print("cv2 kütüphane import etti")

img =  cv2.imread("Resources/tesla_truck.jpg")
print(img.shape)
img2 = np.zeros((512,512,3),np.uint8)
print(img2)
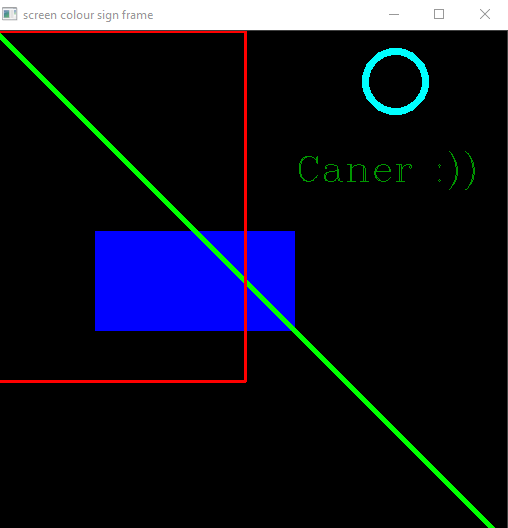
img2[200:300,100:300]=255,0,0 # tüm alanı aynı renge boyamak istiyorsan bu şekilde yazabilirsin,
                                # diğer türlüsü örnekteki gibi olmalıdır. 255,0,0 mavi rengini veriyor
#cv2.line(img2,(0,0),(300,300),(0,255,0),3)  #Ekrana sol üst köşeden 300,300 noktasına kadar yeşil çizgi çekti.
cv2.line(img2,(0,0),(img2.shape[1],img2.shape[0]),(0,255,0),3) #sol üst köşeden karşı köşeye yeşil çizgi çekti.
cv2.rectangle(img2,(0,0),(250,350),(0,0,255),2)   #Kırmızı dikdörtgen çizgi attı. 2 kalınlığı belirtir arttıkça artar 2 yerine "cv2.FILLED" ibaresi eklenirse içi dolu bir dikdörtgen elde edilir.
cv2.circle(img2,(400,50),30,(255,255,0),5)
cv2.putText(img2, "Caner :))",(300,150),cv2.FONT_HERSHEY_COMPLEX,1.2,(0,150,0),1)

imgResize = cv2.resize(img,(640,480))
print(imgResize.shape)

kernel = np.ones((5,5),np.uint8)


imgGray = cv2.cvtColor(imgResize, cv2.COLOR_BGR2GRAY)
imgBlur = cv2.GaussianBlur(imgGray,(7,7),0)
imgCanny = cv2.Canny(imgResize,150,200)
imgDialation = cv2.dilate(imgCanny, kernel, iterations=1)
imgEroded = cv2.erode(imgDialation, kernel, iterations=1)
imgCropped = img[0:200,200:400]


cv2.imshow("gray ourcar", imgGray)
cv2.imshow("blur ourcar", imgBlur)
cv2.imshow("canny ourcar", imgCanny)
cv2.imshow("Dialation Image", imgDialation)
cv2.imshow("Eroded Image", imgEroded)
cv2.imshow("Cropped Image", imgCropped)
cv2.imshow("screen colour sign frame",img2)


cv2.waitKey(100) # burada milisecound cinsinden değer giriliyor eğer 0 yazarsan hep açık kalır açık kalma süresini belirliyorsun.

cap = cv2.VideoCapture("Resources/Lane Detection Test Video 01.mp4")

cap2 = cv2.VideoCapture(0)# "0" her hangi bir kameradan görüntü almamıza yarar.
cap2.set(3,640)
cap2.set(4,480)

while True:
    success, video = cap.read()
    success, video2 = cap2.read()
    cv2.imshow("Video", video)
    cv2.imshow("CAM", video2)
    if cv2.waitKey(1) & 0xFF == ord('q'):   # "q"ya basana kadar video kapanmaz, basıldıktan sonra looptan çıkar.
        break
10 Ocak 2021 Pazar
OPENCV ile Görüntü İşleme Çalışmaları
9 Aralık 2020 Çarşamba
Udacity- Artifical Intelligence for Robotic Education-Problems Solutions
Generalized Uniform Distribution
pHit and pMiss
Sum of Probabilities
Sense Function
Normalized Sense Function
13 Eylül 2020 Pazar
Unity Nedir? (Üzerinde çalışılıyor....)

Neden Unity?
Araştırmalarıma göre büyük bir grubun içinde değilseniz sağlamda bir yazılım geçmişiniz yoksa Unreal Engine sizi biraz kasar deniyor. O nedenle Unity kullanmak ilk etapta kaynağında daha fazla olması nedeniyle daha kritik.
CS kodlarını görüntülemek için Notepad++ veya Sublime kullanabilirsiniz.
Roll a Ball
Tutorildaki ilk eğitim bu. Ben bir türlü topumu hareket ettirememiştim buraya topun ayarlarını atacağım. Dikkatli şekilde incelerseniz. Top kesin hareket eder.
using System.Collections;
using System.Collections.Generic;
using UnityEngine;
using UnityEngine.InputSystem;
public class PlayerController : MonoBehaviour
{
public float speed = 0;
private Rigidbody rb;
private float movementX;
private float movementY;
// Start is called before the first frame update
void Start()
{
rb = GetComponent<Rigidbody>();
}
private void OnMove(InputValue movementValue)
{
Vector2 movementVector = movementValue.Get<Vector2>();
movementX = movementVector.x;
movementY = movementVector.y;
}
private void FixedUpdate()
{
Vector3 movement = new Vector3(movementX, 0.0f, movementY);
rb.AddForce(movement * speed);
}
}
------------------------------------------------------------------------------------
Camera Script
using System.Collections;
using System.Collections.Generic;
using UnityEngine;
public class Camerascript : MonoBehaviour
{
public GameObject player;
private Vector3 offset;
// Start is called before the first frame update
void Start()
{
offset = transform.position - player.transform.position;
}
// Update is called once per frame
void LateUpdate()
{
transform.position = player.transform.position + offset;
}
}
Player Controller Script
using System.Collections;
using System.Collections.Generic;
using UnityEngine;
using UnityEngine.InputSystem;
public class PlayerController : MonoBehaviour
{
public float speed = 0;
private Rigidbody rb;
private float movementX;
private float movementY;
// Start is called before the first frame update
void Start()
{
rb = GetComponent<Rigidbody>();
}
private void OnMove(InputValue movementValue)
{
Vector2 movementVector = movementValue.Get<Vector2>();
movementX = movementVector.x;
movementY = movementVector.y;
}
private void FixedUpdate()
{
Vector3 movement = new Vector3(movementX, 0.0f, movementY);
rb.AddForce(movement * speed);
}
}
Kaynak:
https://learn.unity.com/tutorial
https://learn.unity.com/courses
https://docs.unity3d.com/ScriptReference/30_search.html?q=Input
https://forum.unity.com/
Programming Logic Controllers (SPS), TIA Portal
INTRODUCTION This report provides an overview of the TIA (Totally Integrated Automation) Portal software from Siemens. The TIA wh...

-
Udemy Problems Solve Exercise-1 Quiz: Average Electricity Bill It's time to try a calculation in Python! My electricity bil...


