import gym

env = gym.make("MountainCar-v0")
env.reset()

done = Falsewhile not done:
    action = 2  # always go right!    env.step(action)
    env.render()
8 Haziran 2020 Pazartesi
Q LEARNING
5 Haziran 2020 Cuma
Autonomous Car Simulation with CARLA
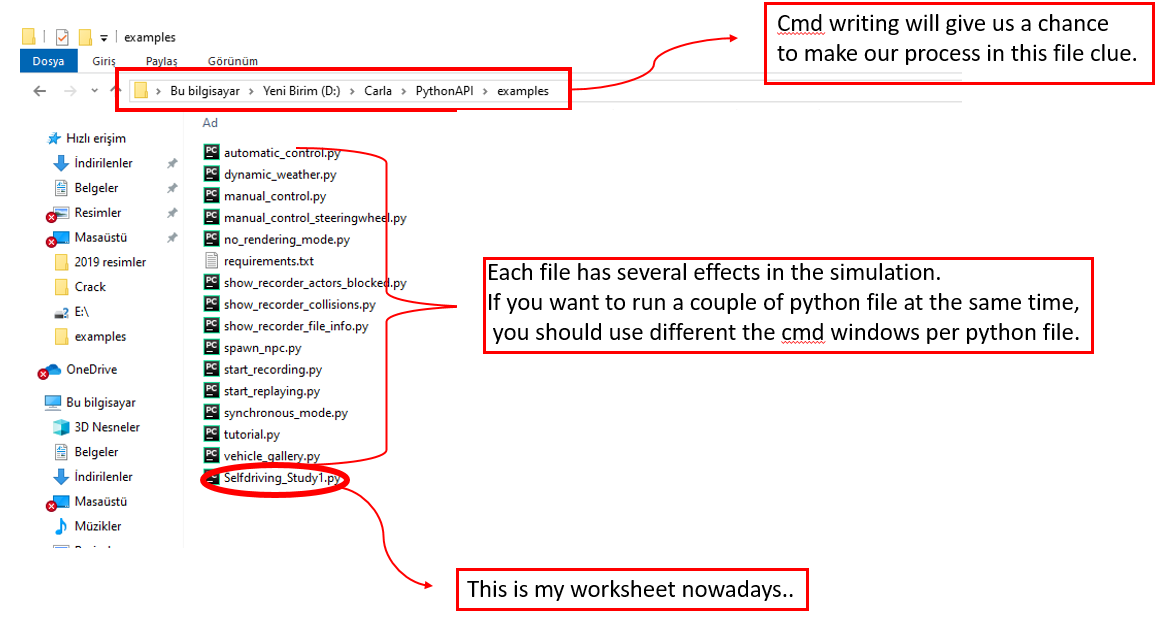
D:\Carla\PythonAPI\examples>python3.7 Selfdriving_Study1.py
ActorBlueprint(id=vehicle.tesla.model3,tags=[vehicle, tesla, model3])
destroying actors
done.
import glob
import os
import sys
try:
    sys.path.append(glob.glob('../carla/dist/carla-*%d.%d-%s.egg' % (
        sys.version_info.major,        sys.version_info.minor,        'win-amd64' if os.name == 'nt' else 'linux-x86_64'))[0])
except IndexError:
    passimport carla

import random
import time
import numpy as np
import cv2

IM_WIDTH = 640IM_HEIGHT = 480

def process_img(image):
    i = np.array(image.raw_data)
    i2 = i.reshape((IM_HEIGHT, IM_WIDTH, 4))
    i3 = i2[:, :, :3]
    cv2.imshow("", i3)
    cv2.waitKey(1)
    return i3/255.0

actor_list = []
try:
    client = carla.Client('localhost', 2000)
    client.set_timeout(10.0)

    world = client.get_world()

    blueprint_library = world.get_blueprint_library()

    bp = blueprint_library.filter('model3')[0]
    print(bp)

    spawn_point = random.choice(world.get_map().get_spawn_points())

    vehicle = world.spawn_actor(bp, spawn_point)
    vehicle.apply_control(carla.VehicleControl(throttle=1.0, steer=0.0))
    # vehicle.set_autopilot(True)  # if you just wanted some NPCs to drive.
    actor_list.append(vehicle)

    # https://carla.readthedocs.io/en/latest/cameras_and_sensors    # get the blueprint for this sensor    blueprint = blueprint_library.find('sensor.camera.rgb')
    # change the dimensions of the image    blueprint.set_attribute('image_size_x', f'{IM_WIDTH}')
    blueprint.set_attribute('image_size_y', f'{IM_HEIGHT}')
    blueprint.set_attribute('fov', '110')

    # Adjust sensor relative to vehicle    spawn_point = carla.Transform(carla.Location(x=2.5, z=0.7))

    # spawn the sensor and attach to vehicle.    sensor = world.spawn_actor(blueprint, spawn_point, attach_to=vehicle)

    # add sensor to list of actors    actor_list.append(sensor)

    # do something with this sensor    sensor.listen(lambda data: process_img(data))

    time.sleep(5)

finally:
    print('destroying actors')
    for actor in actor_list:
        actor.destroy()
    print('done.')
import glob
import os
import sys
try:
    sys.path.append(glob.glob('../carla/dist/carla-*%d.%d-%s.egg' % (
        sys.version_info.major,        sys.version_info.minor,        'win-amd64' if os.name == 'nt' else 'linux-x86_64'))[0])
except IndexError:
    passimport carla

import random
import time
import numpy as np
import cv2

im_width = 640im_height = 480

def process_img(image):
    i = np.array(image.raw_data)
    i2 = i.reshape((im_height, im_width, 4))
    i3 = i2[:, :, :3]
    cv2.imshow("", i3)
    cv2.waitKey(1)
    return i3/255.0

actor_list = []
try:
    client = carla.Client('localhost', 2000)
    client.set_timeout(10.0)

    world = client.get_world()

    blueprint_library = world.get_blueprint_library()

    bp = blueprint_library.filter('model3')[0]
    print(bp)

    spawn_point = random.choice(world.get_map().get_spawn_points())

    vehicle = world.spawn_actor(bp, spawn_point)
    vehicle.apply_control(carla.VehicleControl(throttle=1.0, steer=0.0))
    actor_list.append(vehicle)

    # sleep for 5 seconds, then finish:    time.sleep(5)

finally:

    print('destroying actors')
    for actor in actor_list:
        actor.destroy()
    print('done.')
31 Mayıs 2020 Pazar
Counting car in Traffic Flow with OpenCV Python
import cv2
import numpy as np

Video_TrafficFlow = cv2.VideoCapture("video.mp4")
fgbg = cv2.createBackgroundSubtractorMOG2()

kernel = np.ones((5,5),np.uint8)

font = cv2.FONT_HERSHEY_SIMPLEX

class Coordinate:
    def __init__(self,x,y):
        self.x=x
        self.y=y

class Sensor:
    def __init__(self, Coordinate1, Coordinate2, Square_Width, Square_Length):
        self.Coordinate1 = Coordinate1
        self.Coordinate2 = Coordinate2
        self.Square_Width = Square_Width
        self.Square_Length = Square_Length
        self.Mask_Area = abs(self.Coordinate2.x-Coordinate1.x)*abs(self.Coordinate2.y-self.Coordinate1.y)
        self.Mask = np.zeros((Square_Length, Square_Width, 1), np.uint8)
        cv2.rectangle(self.Mask, (self.Coordinate1.x, self.Coordinate1.y), (self.Coordinate2.x, self.Coordinate2.y), (255), thickness=cv2.FILLED)
        self.Case = False
        self.Numberof_Detected_Cars = 0

"""def Shadow_Del(Picture):
    rgb_planes = cv2.split(Picture)
    dst = np.zeros(shape = (5, 2))
    result_planes = []
    result_norm_planes = []
    for plane in rgb_planes:
        dilated_img = cv2.dilate(plane, np.ones((7, 7), np.uint8))
        bg_img = cv2.medianBlur(dilated_img, 21)
        diff_img = 255 - cv2.absdiff(plane, bg_img)
        norm_img = cv2.normalize(diff_img,None, alpha=0, beta=255, norm_type=cv2.NORM_MINMAX, dtype=cv2.CV_8UC1)
        result_planes.append(diff_img)
        result_norm_planes.append(norm_img)
    result = cv2.merge(result_planes)
    result_norm = cv2.merge(result_norm_planes)
    return result_norm"""  # This side is created for shadow and brilliant area but it didnt finished yet


Sensor1 = Sensor (Coordinate(310,180),Coordinate (420,240), 1080, 250)

#cv2.imshow("Mask", Sensorr1.Mask)


while (1):
    ret, Trafficflow = Video_TrafficFlow.read()

    CuttingSquare = Trafficflow[350:600, 100:1180]
  #  CuttingSquare = Shadow_Del(CuttingSquare)

    Black_White_Screen = fgbg.apply(CuttingSquare)
    Black_White_Screen_MorOpening = cv2.morphologyEx(Black_White_Screen , cv2.MORPH_OPEN, kernel)
    ret, Black_White_Screen_MorOpening = cv2.threshold(Black_White_Screen_MorOpening, 127, 255, cv2.THRESH_BINARY)

    cnts, hierarchy = cv2.findContours(Black_White_Screen_MorOpening , cv2.RETR_TREE,cv2.CHAIN_APPROX_NONE)

    Result = CuttingSquare.copy()
    Filled_Picture = np.zeros ((CuttingSquare.shape [0], CuttingSquare.shape[1], 1), np.uint8)

    for cnt in cnts:
        x, y, w, h = cv2.boundingRect(cnt)
        if(w>30 and h>30):

            cv2.rectangle(Result, (x,y), (x+w, y+h), (0,255,0), thickness=4)
            cv2.rectangle(Filled_Picture, (x,y), (x+w, y+h), (255), thickness= cv2.FILLED)


    Sensor1_Mask_Result = cv2.bitwise_and(Filled_Picture, Filled_Picture, mask=Sensor1.Mask)
    Sensor1_Numberof_White_Pixel = np.sum(Sensor1_Mask_Result==255)
    Sensor1_Oran = Sensor1_Numberof_White_Pixel/Sensor1.Mask_Area

    if(Sensor1_Oran>=0.75 and Sensor1.Case == False):
        cv2.rectangle(Result, (Sensor1.Coordinate1.x, Sensor1.Coordinate1.y),
                      (Sensor1.Coordinate2.x, Sensor1.Coordinate2.y), (0, 255, 0), thickness=cv2.FILLED)
        Sensor1.Case = True
    elif (Sensor1_Oran<=0.75 and Sensor1.Case == True):
        cv2.rectangle(Result, (Sensor1.Coordinate1.x, Sensor1.Coordinate1.y),
                      (Sensor1.Coordinate2.x, Sensor1.Coordinate2.y), (0, 0, 255), thickness=cv2.FILLED)
        Sensor1.Case=False
        Sensor1.Numberof_Detected_Cars +=1
    else:
        cv2.rectangle(Result, (Sensor1.Coordinate1.x, Sensor1.Coordinate1.y),
                      (Sensor1.Coordinate2.x, Sensor1.Coordinate2.y), (0, 0, 255), thickness=cv2.FILLED)


    cv2.putText (Result, str(Sensor1.Numberof_Detected_Cars), (Sensor1.Coordinate1.x, Sensor1.Coordinate1.y+60), font, 3, (255,255,255),3,cv2.LINE_AA)

    #cv2.imshow("Traffic Flow", Trafficflow)
    cv2.imshow("Black White Screen Morphologia Opening", Black_White_Screen_MorOpening )
    #cv2.imshow("Cutting Square", CuttingSquare)
    cv2.imshow("Result", Result)
    cv2.imshow("Filled Picture", Filled_Picture)
    cv2.imshow("Sensor1 Mask Result", Sensor1_Mask_Result)

    k = cv2.waitKey(30) & 0xff
    if k == 27:
        break

Video_TrafficFlow.release()
cv2.destroyAllWindows()
26 Mayıs 2019 Pazar
9 Mayıs 2019 Perşembe
Kaydol:
Yorumlar (Atom)
Programming Logic Controllers (SPS), TIA Portal
INTRODUCTION This report provides an overview of the TIA (Totally Integrated Automation) Portal software from Siemens. The TIA wh...

-
Udemy Problems Solve Exercise-1 Quiz: Average Electricity Bill It's time to try a calculation in Python! My electricity bil...


